
Everywhere you look there is information about Spring, Mothers day, and Easter. On The Silhouette Design Store its no different, and with so much to choose from , let me just say, I have been overwhelmed.
I recently put a huge package up for Mother’s Day on Etsy, and at first I was thinking to make all the cards, frames, the quotes etc. from the package, and show the physical product here on the blog, but I really enjoy doing projects from other designers and rating them. So….
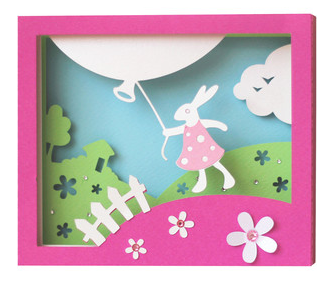
When I saw this little Shadow Box Card by Daniela Angelova (one of my favourite designers), on sale in the design store for $0.74 I knew I had found my project.
Project Summary:
5X7 EASTER SHADOW BOX CARD by Daniela Angelova Design ID #125369 project got an overall score of 46 out of 48. The total time was about 30 minutes
Most importantly, the question is, would I make this again? Yes
Is this project versatile? You could use the little flowers and fence in other projects, or cut the rabbit out for other cards etc. I can see it used for a birthday or a thank you card.
Materials used
4 different colour cardstock: white, dark pink, green, light pink cardstock Glue.Silhouette CAMEO®
The pieces were few and easy to layout on the mat. I also liked that the pieces were grouped to minimize the amount of paper used.
TIP: As always I filled in the pieces with the same colour as the paper I will use as it helps to keep me organized.
To cut all the pieces , and to fold the score lines took about 10 minutes, another 5 minutes to glue.Give yourself an 15 to 20 minutes to complete for the first time.
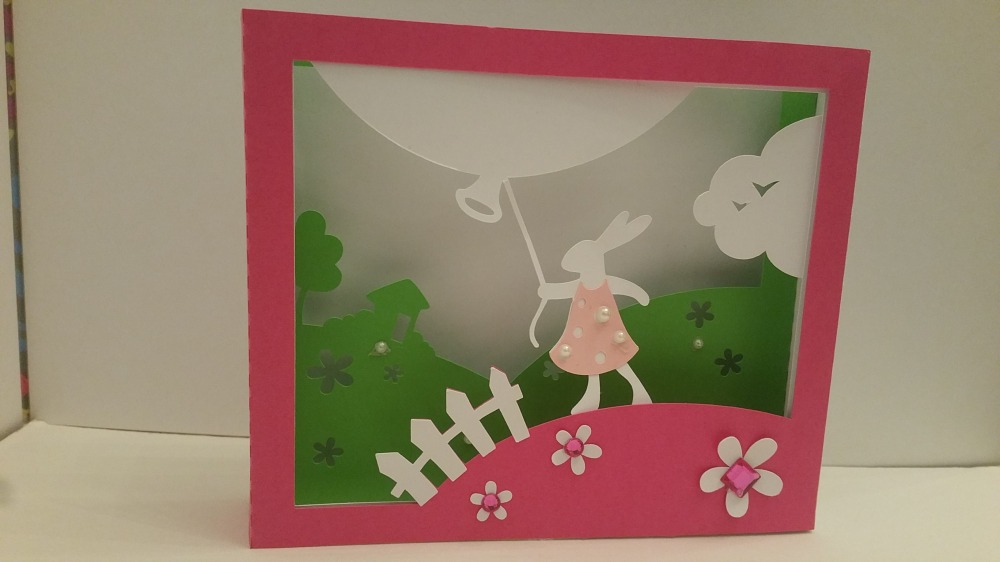
There were no tutorial links on The Silhouette Design Store or on the designers website for this particular Shadow Box but there were free files on her website and other Easter Shadow Boxes. I followed the photo and it turned out great.This is what I did
- Following the photo, I glued the white fence over the dark pink cut out piece, and glued the flowers down applying glue only to the centre so the flower was almost 3D with the petals unglued. little gems can be stuck the the centre of the flowers for some “bling”
- Next I glued the light pink dress to the rabbit
- 3. folded all the fold lines
- Glued the dark Pink and Large white pieces to form a box
- I was stumped for a second on what to do with the square white piece then figured out its was to hide where the pink joins the white to makes up the body of the box, once I figured out what to do with it, it got glued down
- next all the layers were inserted and glued. the green got stuck so that the edge of the paper was flush against the back of the card and the white layer with the rabbit and ballon was lined up so that the white edge was against the green layer.
- finished!
This project can be done by younger kids with guidance.
This file was $0.74 from the The Silhouette Design Store . Other Shadow Boxes range from $.99 to $1.99 so this project was really great price, I went and bought her other files since they are so cute.
When I looked for SVG files to buy on the web, I Googled Shadow Box and tunnel cards: Etsy was the most expensive one I saw at $155, but it may have included the lighting. This one on Etsy is beautiful for $19. and again on Etsy for $5.55, and The Silhouette Design Store from $0.74 to $1.99 is really worth it. Free! is always great so my blog with a Christmas Card is still available
Other places for Shadow boxes
BUY: Etsy
RESOURCES
Not SO Clever People on Pinterest where I have a collection of tunnel card pin including a few tutorials.
REVIEW
Step by step Review: based on the 8 points that seem to capture what a crafter would want to know.
1. Price of downloading the file
- Free to $.99
- $.99 to $2.99
- $2.99 to $4.99
- $4.99 to $6. 99
- $6.99 to $8.99
- $8.99 0r more
This file was $0.74 on Sale regular price $0.99 a score of 6 out of 6 either way
2. Open file
- Layout when opened was super simple and I knew what to do
- Looked at layout and was confused so visited blog, video, website
- Looked at file, had no idea what I was seeing, no information to be found to help!
Layout when opened was super simple and I knew what to do. As always I coloured in the pieces to keep me organized. This got a 6 out of 6 for open file category.


3. Cutting the file
- Had no difficulties cutting this file
- Had some difficulties cutting this file
- Had tons of headache cutting this file
Had no difficulties cutting this file “cutting the file” step gets a 6 out of 6
4. Easy to construct?
- so easy a young kid can do this
- medium difficulty if you and not too crafty you can still achieve a good result
- Hard: you need to really know what you are doing and have been crafting most of your life.
So easy a young kid can do this: No instruction except for the photo as a guide. BUT no tutorial so lost points … I give this a easy rating of 5 out of 6.
5. Needed extra items
- I had to add extra items to finish this project for example string, grommets, rhinestones etc.
- I could add if I wanted to.
- did not have to add anything other than the paper
I added a few gems for extra “bling” “I had to add extra items to finish this project for example string, grommets, rhinestones etc.” a 5 out of 6
6. Finished product
- looked exactly like the photo online
- sort of looked the same
- No Way did this turn out the same.
Looked exactly like the photo online(except for the type of gems) . This gets a 6 out of 6
7. Recommend the file/ designer
- I would recommend this file and designer to anyone
- I would not recommend the file or designer to anyone
- I would recommend the file
- I would recommend the designer
I will recommend this file and designer to anyone and give it a 6 out of 6.
8. The overall cost for the project was
- Under $5.00
- Under $10
- Over $10
I give “the overall cost for the project” a 6 out of 6 since it was under $5.00 to complete this project:
- 1 sheet of 8.5 in x 11 in dark pink Cardstock paper
- 1.5 sheet 8.5 in. x 11 in. white cardstock
- half sheet8.5 in. x 11 in. green cardstock
- scrap piece light pink 2in. x 2 in.
- Glue
- My Silhouette CAMEO® machine.
My over all score for this project is 46 out of 48.
Carolyn
On behalf of Not So Clever People

Such a cute project. I do like reading your reviews!
LikeLiked by 1 person
Thank you, I love doing the reviews but looking at how can it be a bit more relevant for crafters…..
LikeLiked by 2 people
I Love this. It is so adorable I had to share it! =)
LikeLike
Thank you so much for sharing. I love shadow box/ cards.
LikeLiked by 1 person
Its really pretty. I have a Silhouette machine to. I havent quite learned how to use it. I did download that card. I might have to try it out. I will let you know when I do! =)
LikeLike
Would love to see your finished product. I loved mine and I will do two wiper next!
LikeLiked by 1 person
Cant wait to see that =)
LikeLiked by 1 person
Great review and product!
LikeLiked by 1 person